
How to Prevent Bud Rot in Outdoor Cannabis Before It Starts
Bud rot has a bad habit of showing up after an outdoor plant finally starts looking exciting. Flowers are stacking, branches are getting heavier, and then one small sugar leaf turns brown for no obvious reason.
By the time gray or brown mold is easy to see on the outside of a flower, the damage may already extend deeper into the bud. That is why the best way to handle outdoor cannabis bud rot is to make the garden less inviting to it before the flowers become dense.
Prevention does not mean trying to control the weather. It means improving airflow, keeping flowers as dry as practical, supporting branches, watching for caterpillar damage, and building a quick inspection routine for rainy or humid stretches.
Why Bud Rot Can Show Up Fast in Outdoor Flower
Bud rot is commonly associated with Botrytis cinerea, a fungal plant pathogen that affects many crops and can infect cannabis flowers. Outdoor growers cannot remove every spore from the environment. The practical goal is to reduce moisture, damaged tissue, and crowded growth that help an infection establish.
Dense flowers create their own little climate
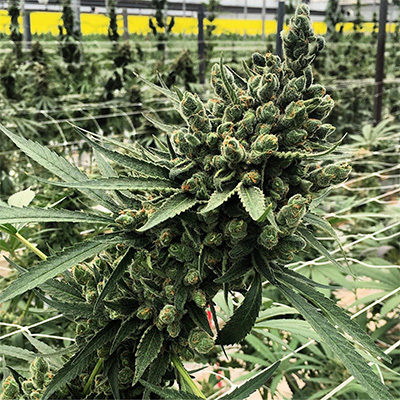
A cannabis flower can feel dry on the outside while holding moisture closer to the stem. As flowers gain size, overlapping bracts and sugar leaves slow evaporation and block air from reaching the center.
That hidden pocket matters more than the humidity reading from a weather app. A breezy afternoon may dry the outer canopy while the inside of a large flower stays damp after rain, dew, or condensation.
Moisture matters more once flowers bulk up
University of California IPM explains that Botrytis spores require free moisture to germinate and that crowded, poorly ventilated plants stay wet longer. Its management guidance emphasizes sanitation, spacing, airflow, and avoiding overhead irrigation during bloom.
That lines up with what outdoor growers see in late summer and fall. A quick shower is not automatically a disaster, but repeated wetting, cool nights, heavy dew, and slow-drying flowers can turn a manageable season into a much riskier one.
Dead and damaged tissue gives the fungus a place to start
Botrytis readily colonizes declining, dead, or injured plant material. Broken stems, dead leaves caught inside flowers, insect feeding, and damaged tissue can all create trouble spots.
That is why bud rot prevention isn’t just about humidity. A clean canopy and an undamaged plant give you fewer weak points to worry about when the weather turns wet.
Start Prevention Before the Buds Get Dense
The easiest time to improve airflow is before every branch is carrying a sticky flower. Once buds are heavy, even a simple adjustment becomes harder to make without bumping, squeezing, or damaging them.
Open the canopy without stripping the plant
Start with dead leaves, damaged growth, small shoots lying against the soil, and crowded interior material that receives very little light. Removing obvious problem growth makes the plant easier to inspect and gives air a cleaner path through the canopy.
You do not need to remove every large fan leaf. Healthy leaves are still working for the plant. The goal is to create breathing room, not to leave the branches bare.
Separate branches that are pressing together
When two flowering branches lean into each other, they create a tight shaded pocket that dries slowly. Use soft ties, stakes, cages, or a trellis to give each branch a little space.
This does not need to look perfect. If you can see through the plant, reach the inner branches, and inspect flower sites without wrestling with the canopy, you are moving in the right direction.
Support branches before rain adds weight
Rainwater can make an already-heavy branch sag or fold into the rest of the plant. Add support while the branch is still upright and easy to reach.
Check every tie as stems thicken. A support should hold the branch without cutting into it, rubbing the bark, or creating a new injury site.
Keep Flowers Dry Without Panicking About Every Rain
Outdoor cannabis will experience weather. Your job isn’t to keep every raindrop off the garden. It is to keep flowers from staying wet longer than necessary.
Water the root zone instead of the canopy
Direct irrigation into the soil or growing medium. Avoid overhead watering during flowering, especially late in the day when leaves and buds may remain wet into the night.
If morning watering fits your setup, it gives accidental splashes more time to dry. Mosca’s guide to watering outdoor cannabis in summer heat also explains why the root zone should be checked before watering instead of following a rigid schedule.
Check the garden after rain or heavy dew
You do not have to tear flowers apart after every storm. Walk the garden once the weather clears and focus on places that naturally stay wet longer:
- Large terminal flowers and dense branch tips
- Branches touching each other or leaning into a cage
- Shaded interior growth with very little air movement
- Flowers beside dead leaves, broken stems, or visible pest damage
- Low branches close to wet soil, mulch, walls, or fencing
If branches are crowded, gently reposition them while they are still flexible. Remove trapped dead leaves and let normal air movement do the drying. Avoid squeezing flowers to check them; pressure can bruise tissue and spread material from one site to another.
Use rain covers carefully
A temporary rain cover can help during a wet stretch, but only if it stays above the canopy and remains open enough for air to move. Plastic sitting directly on the plant traps moisture and can create the exact problem you were trying to prevent.
Think roof, not greenhouse wrap. Give warm, humid air somewhere to escape, secure the cover against wind, and take it down when the weather improves if the garden no longer needs it.
Caterpillars and Plant Damage Can Open the Door
Caterpillars are more than a leaf-chewing nuisance in an outdoor cannabis garden. Some feed inside developing flowers, where the damage and droppings can be hard to see.
Watch for more than the caterpillar itself

You may notice chewed leaves, small holes, eggs on leaf undersides, black frass, a dying sugar leaf, or a flower tip that looks oddly brown. Those clues deserve a closer look even when the insect is nowhere in sight.
Mosca’s guide to caterpillars in outdoor cannabis explains how feeding damage and frass can contribute to mold and bud rot inside flowers.
Inspect early so you have more options
Pest control becomes more complicated once flowers are well developed. Regular scouting gives you a chance to identify eggs or early feeding damage before a hidden problem grows inside the bud.
Mosca’s Integrated Pest Management Guide is useful here because it treats prevention, inspection, identification, sanitation, and recordkeeping as one routine, rather than waiting for a full infestation.
Build a Late-Summer Inspection Routine
Bud rot prevention works better as a short habit than a once-a-week deep dive. A quick morning walk and another look after rain can catch changes while they are still small.
Start with the highest-risk plants
Check the densest flowers, the most crowded plants, and any cultivar that naturally stacks tight buds. Also give extra attention to plants beside fences, buildings, hedges, or other areas where air movement is limited.
After a storm, start with branches that bent, rubbed, or stayed shaded. After several humid nights, start with interior flowers and any spot where a sugar leaf suddenly changed color.
Look before you touch
Use your eyes and nose first. Look from several angles, check the small leaves coming out of the flower, and notice whether one section looks dull or dry compared with the healthy growth around it.
Avoid moving from a suspicious flower to healthy flowers with the same gloves or tools. If you need to investigate more closely, handle the area gently and clean up before continuing through the garden.
Keep simple notes
A note about the date, weather, plant, and location of a suspicious spot helps you see whether the issue is isolated or spreading. You do not need a complicated spreadsheet. Even a phone note can keep you from forgetting which branch needed another look tomorrow.
Early Bud Rot Signs You Should Never Ignore
Bud rot often begins inside a flower, so the earliest outside sign may look small. One damaged sugar leaf can be more important than a whole lower leaf fading normally late in the season.
Watch for localized changes
Healthy flowering plants can lose an occasional older leaf. Bud rot is more suspicious when the change is sudden, localized, and connected to one flower or branch.
Warning signs worth investigating include:
- A sugar leaf that suddenly turns yellow, brown, or dry while nearby leaves look healthy
- A soft, dull, tan, brown, or gray patch on a flower
- Flower material that pulls away unusually easily from the stem
- Gray, fuzzy, dusty, or web-like growth inside the bud
- A musty or stale smell that is different from the plant’s normal aroma
- A branch tip that wilts or dies back without an obvious watering problem
The inside may be worse than the outside
Cannabis-specific research on bud rot has documented early yellowing of small leaves around the inflorescence, followed by necrotic areas, internal decay, and eventually gray sporulation under humid or wet conditions.
That progression is why waiting for a dramatic patch of gray mold is risky. A small, unexplained dead leaf sticking out of a dense flower is worth checking promptly.
What to Do if You Find Suspected Bud Rot
Finding a suspicious spot is not the time to shake the plant, squeeze every flower, or carry the affected branch through the rest of the garden. Slow down and keep the problem contained.
Stop handling healthy flowers
Treat the area as contaminated until you know otherwise. Change or clean gloves and tools before touching another plant. Try not to disturb visibly moldy tissue because spores can move through the air.
Remove affected material carefully
Cut away affected plant material with clean tools, taking enough surrounding tissue to avoid leaving an obviously damaged edge behind. Place it directly into a bag or closed container instead of dropping it on the soil or carrying it uncovered through the grow.
Do not compost moldy flowers in or beside the garden. Dispose of them in a way that does not leave infected material around the plants.
Inspect the branch and nearby flowers
Check the stem, nearby buds, and the other side of the plant. Look for the same small warning signs rather than assuming the first visible patch was the whole problem.
Then check again over the next few days, especially if humid or rainy weather continues. Removing one spot does not change the weather that allowed it to develop.
Do not consume moldy cannabis
Do not smoke, vape, process, or otherwise use visibly moldy flower. Cutting away the gray part does not guarantee that the remaining material is clean, and turning contaminated flower into another product does not make the contamination disappear.
Be Careful With Sprays on Developing Flowers
The deeper plants move into flower, the less room there is for random spraying. Buds have a large, textured surface that can hold residues and moisture, and not every product used in a vegetable or ornamental garden is approved for cannabis.
Identify the problem before choosing a product
Bud rot, powdery mildew, caterpillar damage, nutrient stress, and ordinary leaf aging do not have the same solution. Treating the wrong problem can add moisture or residue without fixing anything.
Read the entire label
If you are considering a pest or disease product, confirm that its label and local rules allow that use on the crop and at that stage. Follow application timing, protective equipment, reentry, and preharvest instructions exactly.
Do not assume that a product is safe for flowers because it is described as natural or organic. When the label does not clearly support the intended use, do not improvise.
Fix the environment too
A spray cannot compensate for flowers that stay wet, branches packed together, dead tissue trapped in the canopy, or caterpillar damage that goes unnoticed. Whatever control method you choose, keep working on airflow, sanitation, irrigation, and inspection.
Outdoor Bud Rot Prevention Checklist
Use this quick check as flowers begin gaining size and the weather starts getting less predictable:
- Separate crowded flowering branches and maintain a path for air through the canopy
- Remove dead, damaged, and ground-touching plant material
- Support heavy branches before wind or rain folds them into the plant
- Water the root zone and avoid routine overhead watering during bloom
- Inspect dense flowers after rain, dew, and humid nights
- Watch for caterpillar eggs, chewing, frass, and dying sugar leaves
- Clean tools and gloves after handling suspicious plant material
- Bag and remove affected flowers instead of leaving them near the garden
- Use only products permitted for the crop, growth stage, and location
- Keep simple notes so you can tell whether a problem is isolated or spreading
Common Bud Rot Prevention Mistakes
Waiting until flowers look moldy
Visible gray mold is a late warning sign. Pay attention to localized discoloration, a dead sugar leaf, a musty smell, or a flower that suddenly looks dull compared with the rest of the plant.
Over-defoliating right before bad weather
Some selective cleanup can help airflow, but stripping a plant during heat, drought, pest pressure, or a wet weather swing can add unnecessary stress. Make useful cuts, then give the plant time to respond.
Covering the plant without ventilation
A tight plastic wrap may block rain while trapping warm, humid air around the flowers. Any temporary cover needs clearance above the canopy and open sides or vents.
Leaving damaged material in the garden
Dead leaves, damaged flowers, and discarded trimmings can hold moisture and support fungal growth. Get debris out of the canopy and away from the plant base.
Assuming every brown spot is the same problem
Heat, pests, nutrient issues, broken stems, and normal late-season fade can all change leaf color. Look at the location, speed, smell, texture, weather, and nearby tissue before deciding what you are seeing.
Frequently Asked Questions About Outdoor Cannabis Bud Rot
Bud rot is commonly caused by Botrytis cinerea, although other fungal pathogens can damage cannabis flowers. Risk increases when dense flowers remain wet, humidity stays high, airflow is poor, or damaged and dead tissue is present.
Affected flower tissue will not recover. Carefully remove and dispose of contaminated material, inspect nearby flowers, and improve the conditions that allowed the problem to develop. Continue monitoring because additional symptoms may appear.
How much to remove depends on the location and extent of the damage. The priority is to remove visibly affected material without shaking spores through the garden and to inspect the surrounding stem and flowers carefully. When damage extends along a branch, removing more than one small flower may be necessary.
Rain does not automatically mean a plant will develop bud rot. The bigger concern is how long flowers remain wet and whether dense growth, cool temperatures, weak airflow, pest damage, or dead tissue create a favorable infection site.
No. Do not consume visibly moldy cannabis or try to rescue it through washing, extraction, or another processing method. Discard contaminated flower.
Protect the Flowers Before the Weather Turns
Bud rot prevention is mostly a collection of small habits: keep the canopy open, water the roots, support the branches, watch for caterpillars, remove dead material, and take a closer look after wet weather.
You cannot control every storm or humid night, but you can keep small problems from sitting unnoticed inside a crowded plant. Pair steady late-season care with genetics that fit your climate and growing space. Check out Mosca’s New Drops to buy cannabis seeds for your next grow.